Trickbot is not a new threat, but it is an evolving one. The latest twist of the banking Trojan knife as far as Windows 10 users are concerned is the addition of new methods to not only evade but actually disable Windows Defender security protection. As reported on July 14 in Forbes , Trickbot is a particularly stealthy banking Trojan that has been around since 2016. Since then, it was thought to have compromised no less than 250 million email accounts in an effort to distribute the malware payload. That payload includes the stealing of online banking credentials and cryptocurrency wallets. Microsoft has always been front and center as far as Trickbot attack campaigns are concerned, with weaponized Word and Excel files being a favored approach. The latest campaign is targeting Windows 10 users and implementing a highly detailed and convincing, but fake nonetheless, Office 365 page to prompt for browser updates that install the Trojan itself. Disab...
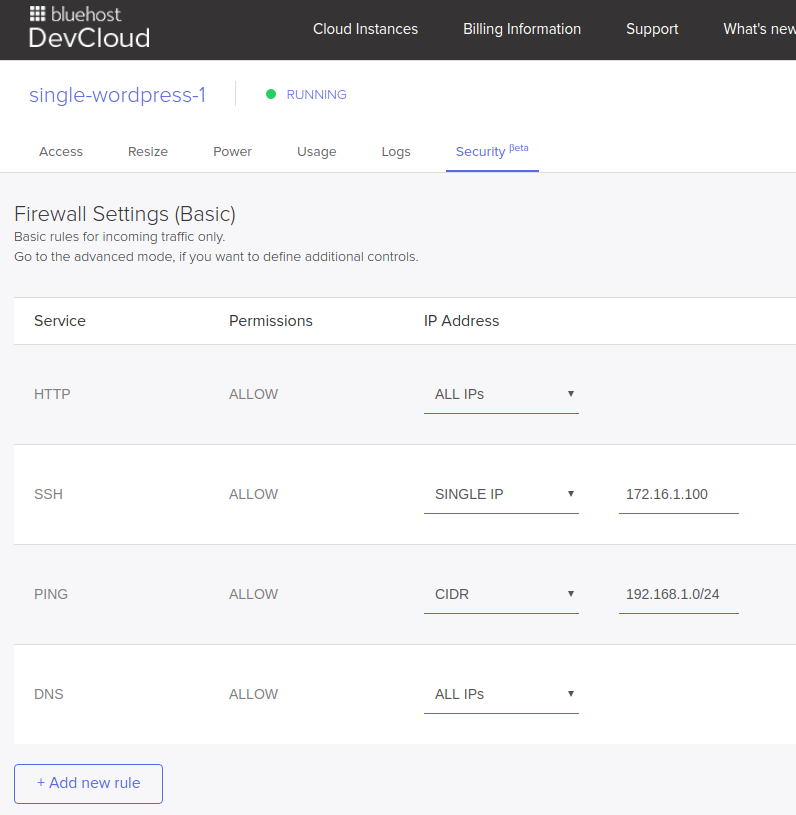
While your DevCloud control panel comes equipped with such a slick web-based GUI for managing firewalls, if you need to manage firewalls (or any application, for that matter) cleanly on more than a few servers, configuration management is usually your best bet. In this article, we will learn how to accomplish that.
Step 1: Ensure you have the official firewall module from the Puppet Forge to your modules directory
If you don’t, it’s easy to install it:
$ puppet module install puppetlabs-firewall
The module is extensively documented in the modules/firewall/README.markdown file which you will find upon successful installation.
The approach we’ll follow here is the same approach that’s recommended for any standard firewall installation: allow only authorized sources and destinations, block the rest. We’ll do this in 3 steps:
- Configure common rules which need to go on all servers (like allowing ICMP and ssh).
- Configure node-specific rules (like allowing port 3306 from your web servers to your MySQL server).
- Set a default policy of DROP to discard everything else.
Step 2: Define a new profile for the firewall
Create a new file, modules/profile/manifests/fw.pp and populate it with contents like these:
class profile::fw {
    class { '::firewall':}
    resources { "firewall": purge => true,}
    create_resources('firewall', hiera_hash('firewall_rules_common', {}))
    create_resources('firewall', hiera_hash('firewall_rules_specific', {}))
    create_resources('firewallchain', hiera_hash('firewall_default_policies', {}))
}
Here, we create a new puppet profile which we can then include in any number of roles and/or nodes.
“create_resources” is a puppet function which will create resources as per a specific definition (firewall and firewallchain in this case, which are defined in the puppetlabs-firewall module).
The purge directive tells puppet what to do in case it finds existing firewall rules on the machine it’s run. Setting this to false means puppet will not touch them (and this may cause duplication of rules) while setting it to true will mean that puppet will remove all existing rules. Be very careful with this option. If your policy for the INPUT or OUTPUT chains is set to DROP, removing all the rules means knocking out your own and the puppet server’s access and then struggling to get back in.
Step 3: Define common firewall rules via Hiera parameters
In your common definition file (hieradata/common.yaml in my case), include the profile created above:
classes:
  - profile::fw
- And then continue populating the rules in the same file:
firewall_rules_common:
  allow_incoming_ICMP:
    name: "000 Allow all incoming pings"
    chain: INPUT
    proto: icmp
    action: accept
  allow_loopback:
    name: "001 Allow all traffic on local loopback interface"
    chain: INPUT
    iniface: lo
    proto: all
    action: accept
The strings like “allow_incoming_ICMP” are just unique hiera keys since there are multiple “firewall’ resources being called. Each rules “name” parameter shows up in the comment part of the rule when listed with the iptables command.
iniface = Input interface, which translates into an `iptables -i <iface>…` command. Similarly, we have
outiface = Output interface, which translates into an `iptables -o <iface>…` command.
- It would also be a good idea to block weird kinds of traffic like this:
reject_non_loopback_local:
    name: "002 reject local traffic not on loopback interface"
    chain: INPUT
    iniface: '! lo'
    proto: all
    destination: '127.0.0.1/8'
    action: drop
- IPTables must be setup to allow 2-way communication in accordance with a classical TCP handshake — not only does the incoming SYN packet need to be allowed through the INPUT chain, the response packets with SYN-ACK and later, ESTABLISHED states also need to be allowed through the OUTPUT chain. Hence we need rules like this one in both the INPUT and the OUTPUT chains:
allow_established_in:
    name: "003 accept responses to outbound connections"
    chain: INPUT
    state: ['RELATED', 'ESTABLISHED']
    action: accept
- Don’t forget to allow SSH from your outgoing IP, or you will lose access to the machine you run this on:
allow_ssh:
    name: "005 Allow SSH from specified IPs"
    chain: INPUT
    source: <MY IP>
    proto: tcp
    dport: ssh
    action: accept
These rules for incoming connections are typical enough that you might want to apply them on all your machines. Next, we move on to outgoing rules.
- You typically want to allow outgoing pings to test connectivity with other machines on the network/Internet:
allow_outgoing_ICMP:
    name: "200 Allow all outgoing pings"
    chain: OUTPUT
    proto: icmp
    action: accept
- Like we described a little earlier, you also need to allow responses to allowed incoming connections to go out:
allow_established_out:
    name: "201 accept responses to inbound connections"
    chain: OUTPUT
    state: ['RELATED', 'ESTABLISHED']
    action: accept
- You need to allow DNS lookups too:
allow_dns_lookups:
    name: "202 allow DNS Lookups from this machine"
    chain: OUTPUT
    proto: udp
    dport: 53
    action: accept
- You also need to allow outgoing connections to your puppetmaster or puppet won’t work after the first run of these rules:
allow_to_puppet1:
    name: "203 allow connections to Puppet Server"
    chain: OUTPUT
    proto: tcp
    dport: 8140
    destination: puppetmaster.example.com
    action: accept
- Finally, we typically allow outbound HTTP and HTTPS since basic things like yum and apt won’t work without them:
allow_outbound_http:
    name: "204 allow outbound HTTP"
    chain: OUTPUT
    proto: tcp
    dport: 80
    action: accept
  allow_outbound_https:
    name: "205 allow outbound HTTPS"
    chain: OUTPUT
    proto: tcp
    dport: 443
    action: accept
Step 4: Configure the Node/Role Specific Rules
This configuration goes in your role/node specific files (hieradata/node/mysql1.yaml in my case):
allow_mysql_from_web_servers:
    name: "100 Allow connections from web servers"
    chain: INPUT
    source: 192.168.1.100-192.168.1.103
    proto: tcp
    dport: mysql
    action: accept
You can use a source (or destination) IP range as shown so iptables will include them in a single rule.
Step 5: Configure the default chain policies
Lastly, we set the default policies of the INPUT and OUTPUT chains to DROP, to silently discard traffic which doesn’t match the explicitly allowed rules. Of course, it is a good idea to use the iptables logging facility to log these disallowed packets so you’ll know what kind of traffic you’re getting. It is also useful in debugging firewall issues.
Step 6: Unlock script
The easiest thing to do when setting up a firewall is to lock yourself out of a remote machine by mistake. Depending on whether it is a virtual or a physical machine, recovering access can be quite a prolonged pain.
Run this useful script on the machine you’re tinkering with before you start modifying firewall rules:
$ while true ; \
do \
sudo iptables -P INPUT ACCEPT ; \
sudo iptables -P OUTPUT ACCEPT ; \
sudo iptables -F
sleep 300 ; \
done
This will reset the policies of the INPUT and OUTPUT chains to ACCEPT all connections so that if you’re trying to access from an IP which is not mentioned in the allow rules, you will still be able to access.
The
iptables -F command will flush(erase) all rules and leave you with a firewall looking like this:$ sudo iptables -nL Chain INPUT (policy ACCEPT) target prot opt source destination
Chain FORWARD (policy ACCEPT)
target     prot opt source               destination
Chain OUTPUT (policy ACCEPT)
target     prot opt source               destination
As long as the above unlock script is running, even if you make a mistake in your rules which locks you out, you will be able to regain access in 5 minutes (300 sec). You can always change that time interval to something more appropriate.
Step 7: Run Puppet Agent
Finally, we run the puppet agent on the machine we want to secure (in this case my database server). You should see output like this (I use puppet’s environments feature to test out changes, you may not need it):
$ sudo puppet agent -t --environment firewall --show_diff
Info: Retrieving pluginfacts
Info: Retrieving plugin
Info: Loading facts
Info: Caching catalog for mysql1.staging.example.com
Info: Applying configuration version '1506598272'
Notice: /Stage[main]/Profile::Fw/Firewall[allow_established_out]/ensure: created
Notice: /Stage[main]/Profile::Fw/Firewallchain[drop_all_output]/policy: policy changed 'accept' to 'drop'
Notice: /Stage[main]/Profile::Fw/Firewall[allow_to_puppet]/ensure: created
Notice: /Stage[main]/Profile::Fw/Firewall[allow_dns_lookups]/ensure: created
Notice: /Stage[main]/Profile::Fw/Firewall[allow_ssh]/ensure: created
Notice: /Stage[main]/Profile::Fw/Firewall[reject_non_loopback_local]/ensure: created
Notice: /Stage[main]/Profile::Fw/Firewall[allow_loopback]/ensure: created
Notice: /Stage[main]/Profile::Fw/Firewall[allow_outbound_http]/ensure: created
Notice: /Stage[main]/Profile::Fw/Firewall[allow_established_in]/ensure: created
Notice: /Stage[main]/Profile::Fw/Firewall[allow_incoming_ICMP]/ensure: created
Notice: /Stage[main]/Profile::Fw/Firewall[allow_outbound_https]/ensure: created
Notice: /Stage[main]/Profile::Fw/Firewall[allow_mysql_from_web_servers]/ensure: created
Notice: /Stage[main]/Profile::Fw/Firewallchain[drop_all_input]/policy: policy changed 'accept' to 'drop'
Notice: /Stage[main]/Profile::Fw/Firewall[allow_outgoing_ICMP]/ensure: created
Notice: Finished catalog run in 31.11 seconds
And you should be able to verify that your iptables firewall is now setup properly:
$ sudo iptables -nL
Chain INPUT (policy DROP)
target     prot opt source               destination
ACCEPT     icmp --  0.0.0.0/0            0.0.0.0/0            /* 000 Allow all incoming pings */
ACCEPT     all  --  0.0.0.0/0            0.0.0.0/0            /* 001 Allow all traffic on local loopback interface */
DROP       all  --  0.0.0.0/0            127.0.0.0/8          /* 002 reject local traffic not on loopback interface */
ACCEPT     tcp  --  0.0.0.0/0            0.0.0.0/0            /* 003 accept responses to outbound connections */ state RELATED,ESTABLISHED
ACCEPT     tcp  --  0.0.0.0/0            0.0.0.0/0            multiport dports 22 /* 005 Allow SSH from specified IPs */
ACCEPT     tcp  --  0.0.0.0/0            0.0.0.0/0            multiport dports 3306 /* 100 Allow SSH from specified IPs */
Chain FORWARD (policy ACCEPT)
target     prot opt source               destination
Chain OUTPUT (policy DROP)
target     prot opt source               destination
ACCEPT     icmp --  0.0.0.0/0            0.0.0.0/0            /* 200 Allow all outgoing pings */
ACCEPT     tcp  --  0.0.0.0/0            0.0.0.0/0            /* 201 accept responses to inbound connections */ state RELATED,ESTABLISHED
ACCEPT     udp  --  0.0.0.0/0            0.0.0.0/0            multiport dports 53 /* 202 allow DNS Lookups from this machine */
ACCEPT     tcp  --  0.0.0.0/0            0.0.0.0/0            destination puppetmaster.example.com multiport dports 8140 /* 203 allow connections to Puppet Servers */
ACCEPT     tcp  --  0.0.0.0/0            0.0.0.0/0            multiport dports 80 /* 204 allow outbound HTTP */
ACCEPT     tcp  --  0.0.0.0/0            0.0.0.0/0            multiport dports 443 /* 205 allow outbound HTTPS */
Here at Bluehost DevCloud, we understand the pain that developers go through trying to wrestle with different tools,especially with the learning curve involved in trying to understand iptables. Keeping that in mind, we have designed Firewall with utmost simplicity that apply the standard rules necessary for any instance to function effeciently.
Source:here
Comments
Post a Comment